Wow, it’s been a long time since I wanted to write this!
So hopefully here you are, getting for the first time your hands dirty with ceramic.
If you ended up here and don’t know what is ceramic engine, you might want to read my previous article first: Discover ceramic, a cross-platform and open-source 2D framework.
At the end of this article, you should be able to:
- Install ceramic on your computer
- Create a new ceramic project
- Display coloured and textured quads (images)
- Attach pointer events to create some basic interactivity
- Plug into the update loop to execute code at every frame
- Create some basic visual transitions
Let’s get started!
Installing ceramic
Download Haxe
Ceramic is built with the Haxe programming language, so that’s the first thing we need to install.
Download and install latest Haxe.
Simply download and run the Haxe installer and follow the instructions.
The rest of the article assumes you are able to understand basic Haxe programming. If you are new to Haxe, you can take a look at the Haxe introduction and the many resources it provides from the Haxe Foundation.
Great! Now, let’s install ceramic
A lot of things are done on the command line with ceramic. We will enter command line instruction with the Terminal app on mac and linux, or with Powershell on windows. You need to be familiar with command line tools to continue.
The easiest way to install ceramic is via haxelib. Open the terminal and type:
haxelib install ceramicThis should have installed a setup utility on your machine. You can now enter a second command to download the actual ceramic package and install it:
haxelib run ceramic setupFollow the instructions, it will tell you where it wants to install ceramic and do it (default behaviour is to create a ceramic folder in the current working directory where you are running your terminal. You can check more advanced install options on the haxelib page).
When it asks you if you want to make ceramic command available globally, you should choose yes so that the ceramic command will work by default on any command line session from any folder on your computer.
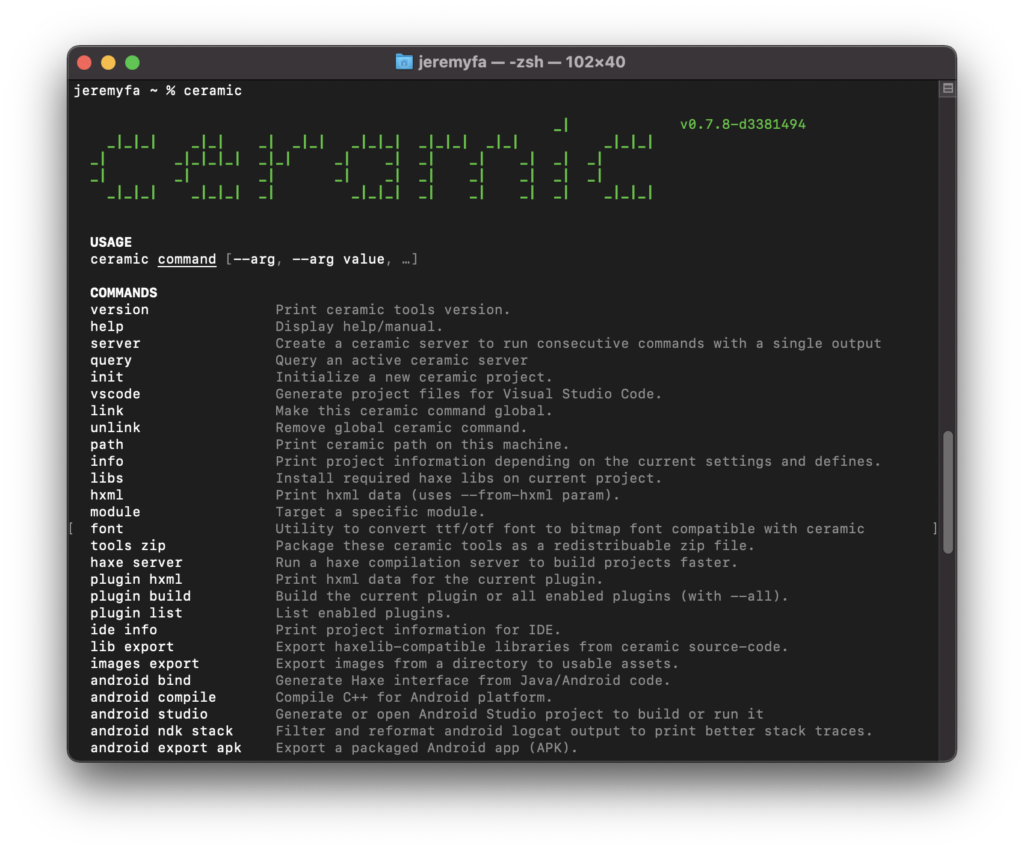
After the command has finished installing, you can check that ceramic is working by typing:
ceramicIf you didn’t install ceramic globally, you can run it with haxelib run ceramic instead.
If you get a similar display as below, that means ceramic has been successfully installed 🎉.
Installing Haxe (and haxelib) on your computer is required to follow this guide as we install ceramic via haxelib, but note that ceramic is mostly self-contained. It embeds its own versions of haxe, node & electron so that it won’t break if you update something on your computer. Projects generated by ceramic contain their own local haxelib repository and are configured to use ceramic’s embedded haxe for code completion and compilation.
Another note to Haxe developers using lix: ceramic is not designed to work with lix. Creating a lix scope inside a ceramic project is not supported. That said, a standard ceramic project should work and compile fine even if your global haxe installation is running via lix, thanks to ceramic being packed with everything it needs already.
Create your first project
Now that ceramic is installed, we can use it to create a new project. Open a terminal again an type:
ceramic init --name myprojectThis should generate and setup your project. Wait a bit, that should not be long!
Run your project
Your project is generated, you can now try to run it to ensure it works.
Set current directory to myproject:
cd myprojectThen call ceramic to run your generated app:
ceramic clay run webYou should see a window open and show the default ceramic app:

Congratulations! You’ve just finished building and running your first project!
Explaining: “ceramic clay run web”
This command is asking ceramic to run your app using clay backend and targeting the web platform.
Ceramic has multiple backends as mentioned in my previous article, that is why we need to specify which backend and which target to use when building and running an app.
In practice, you won’t need to call this command by hand many times, because we will use Visual Studio Code and its ceramic extension to continue.
If you plan to continue using CLI instead of Visual Studio Code later, the full command to run needs additional arguments:
ceramic clay run web --setup --assets–assets argument will ensure your exported project’s assets are kept in sync with your original assets folder in case they changed since last run (but you don’t need to worry about this if you use Visual Studio Code as showcased right below).
–setup argument will ensure your project is properly setup for the given target. This is particularly useful when you build a target for the first time, but it doesn’t hurt keeping the argument for every run.
Editing your project
Visual Studio Code is the official way of working with ceramic projects. If you don’t have it installed, go download and install it.
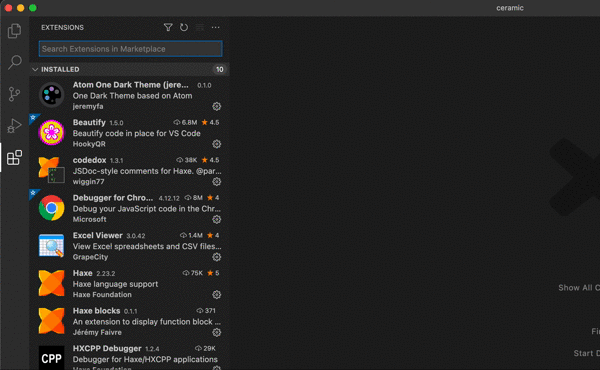
Then, open VSCode and install ceramic extension:
At this point, you should be ready to work on your project.
Open it from Visual Studio Code: File > Open… > choose myproject folder. It should display the following project window:
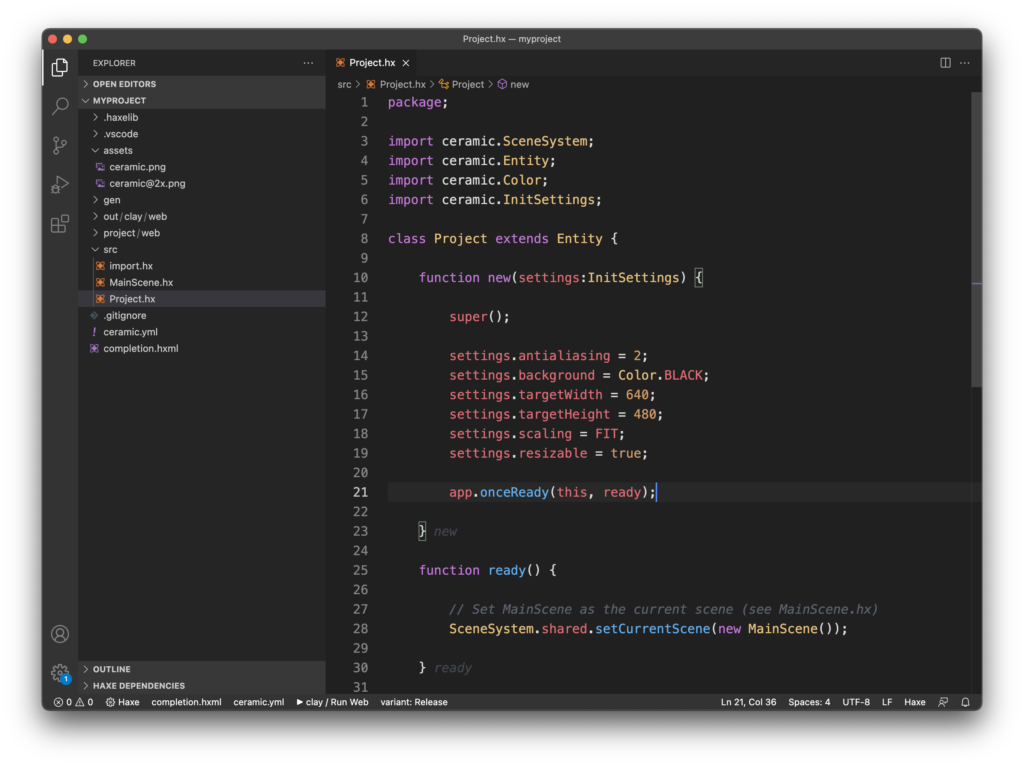
Code completion in Haxe files (*.hx) should work too.
What’s inside the project?
| .haxelib/ | Ceramic automatically initializes a local haxelib repository for every project you create. Haxe libraries are installed locally on this directory and won’t affect the rest of your environment. This is done to ensure every project build is more reproducible and won’t break because of your machine configuration. .haxelib/ contains all your project’s haxe libraries. |
| .vscode/ | Contains Visual Studio Code configuration files. Default files are generated by ceramic with settings ready to use. |
| assets/ | Contains your project’s asset files that will be embedded with the app. Put your images, audio files, etc… inside this folder. The sample project comes with a single image asset to display the logo you’ve seen when running it (with two resolutions: ceramic.png and ceramic@2x.png for high density display). |
| gen/ | Contains Haxe files generated by ceramic. You are not supposed to edit them manually but they are needed to make your project work. These files give you statically typed assets (like Images.CERAMIC to reference our ceramic.png asset), platform specific bindings for iOS or Android etc… Additional ceramic plugins can generate more files here. If you delete this folder, it will be regenerated again at next build. |
| out/ | Contains intermediate build files that ceramic is creating when building your project. You can safely delete this folder as needed. Ceramic will regenerate it when building. |
| project/ | Contains platform specific project/exported files. For instance, if you build for iOS, it will generate an Xcode project and put it inside this folder (project/ios/). If you export for Unity, the Unity project will be added here as well (project/unity/) etc… On the sample project, we only built for web target, so it generated a web folder with the exported html/js/asset files, but ceramic will add additional folders as needed if you build for other targets. |
| src/ | Your actual project source files! That’s where you will edit and add new Haxe files to create your app/game. |
| src/Project.hx | This is the entry point of your app. Project.init() is called with a settings object as argument. You can configure the settings as needed and listen to the ready event. Once the ready event is fired, your ceramic app is ready to run. In the default Project.hx file, a ready() method is bound to the app.ready event. A scene object is created and displayed from that method. |
| src/MainScene.hx | MainScene is an example of ceramic scene. It contains the code to load and display a ceramic logo. It is created by the Project class and assigned as main scene. You can change its content as you want, or create another Scene subclass that you will initialize from Project.hx in place of the existing one. |
| src/import.hx | Contains imports that will be effective on all the haxe files in this folder. The sample project already imports some ceramic helpers that are convenient to be accessible from every file. |
| .gitignore | A generated .gitignore file properly configured to work with your ceramic project. |
| ceramic.yml | Your main project configuration file. This is where you add haxe libraries, enable additional ceramic plugins and configure build flags. There is a wiki page about this ceramic.yml file that you are strongly encouraged to check out. |
| completion.hxml | This file is generated by ceramic to let the Haxe compiler provide proper code completion of your project. As it is generated, you are not supposed to modify it manually. Instead, edit ceramic.yml as needed and completion.hxml will be updated accordingly. |
Run the project from VSCode
To run your project from Visual Studio Code, press CTRL + Shift + B (CMD + Shift + B on Mac).
It should show you the same app window with ceramic logo as when you ran your project from command line.
Ceramic comes bundled with an electron runner, which is used to launch the web export of your app. It takes care of setting up an HTTP server on the fly and creates a window to display your app in a more “native” fashion. This means that when you want to test the web version of you app, you don’t need to manage an HTTP server yourself and don’t have to open some random browser tab that points to your local address. Everything is handled for you!
Creating your first Scene
Alright, now let’s create our very first scene to learn a bit more about basic ceramic API.
Let’s create a new file called GettingStarted.hx inside src/ folder:
import ceramic.Scene;

class GettingStarted extends Scene {

    override function create() {

        log.debug('Hello!');

    }

}
And let’s modify our ready() method in Project.hx so that it will run our new scene instead of the default one:
    function ready() {

        // Set our new GettingStarted scene as the main scene
        app.scenes.main = new GettingStarted();

    }
Let’s try to run that. It should show a black empty window, and a purple “Hello!” log should be printed inside VSCode terminal. That means our scene has been initialized and create() method called!
You can log different kind of messages with ceramic: log.debug(), log.warning(), log.error(), log.info() and log.success(). Each kind of message will show up with a different color on the terminal.
Let’s display a square
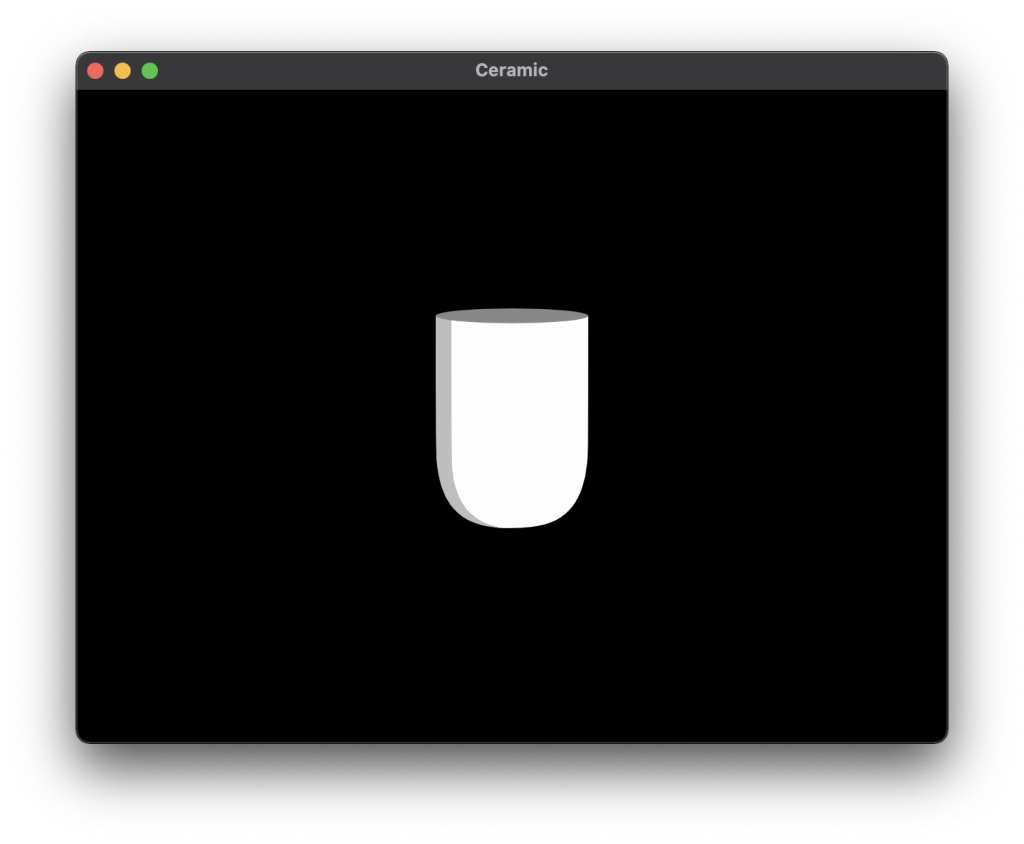
I know we are not making a hit game yet, but let’s start from the beginning: displaying a plain old yellow square 🟨
Edit GettingStarted‘s create() method to do that:
import ceramic.Quad;
import ceramic.Color;
import ceramic.Scene;
class GettingStarted extends Scene {
override function create() {
var quad = new Quad();
quad.size(100, 100);
quad.color = Color.YELLOW;
quad.pos(width * 0.5, height * 0.5);
quad.anchor(0.5, 0.5);
add(quad);
}
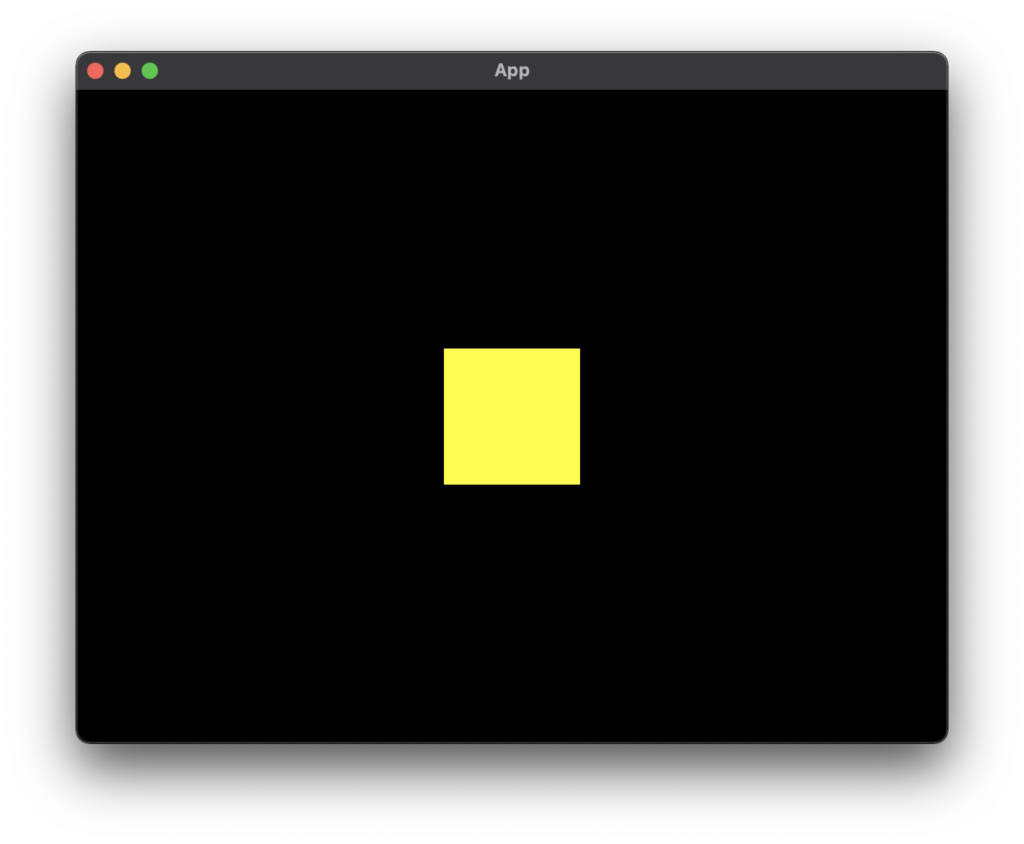
}Build and run the project again, this is what you should see:
Let’s go over this code
That’s great! We are displaying a yellow square!
(everybody has to start somewhere 😌)
Let’s examinate what we did.
1. Import 2 new types: ceramic.Quad and ceramic.Color:
import ceramic.Quad;
import ceramic.Color;
Quad class is used to display quads, that is, a polygon composed of two triangles that will form a square or a rectangle. It’s a very common and versatile type of ceramic API.
Color is an utility to work with RGB colors.
2. Instanciate a new Quad object:
var quad = new Quad();3. Set the width and height of the quad using its size() method:
quad.size(100, 100);This is the equivalent of writing:
        quad.width = 100;
        quad.height = 100;
4. Set the color of the quad as yellow
quad.color = Color.YELLOW;5. Position the quad at the center of the scene
        quad.pos(width * 0.5, height * 0.5);
        quad.anchor(0.5, 0.5);
Note that we also set the anchor of the quad (0.5, 0.5) to its own center, because by default, a quad anchor is at its top left. If we did set its anchor to (1, 1), it would have been centered to its bottom right etc…
Also, we could have done the same thing with the following code. That is strictly equivalent:
        quad.x = width * 0.5;
        quad.y = height * 0.5;
        quad.anchorX = 0.5;
        quad.anchorY = 0.5;
6. Finally, add the quad as a child of the scene
add(quad);Ok that’s nice, we displayed a yellow square at the middle of the screen. What now?
Let’s add some interactivity, so that it will be… an interactive yellow square 🟨🥁
Adding interactivity with pointer events
Let’s do something simple: everytime we click on the square, it changes color! This can be done using pointer events in ceramic.
Add this code at the end of the create() method:
        // Bind to 'pointerDown' event
        quad.onPointerDown(this, info -> {
            log.debug('pointer down: $info');
            quad.color = Color.random();
        });
Build and run again, you should now see your square change color everytime you click on it.
Not that hard so far right? There are still a few things to explain.
With this snippet of code, we are listening to the pointerDown event of our quad. When this event is fired (that is, when we click on the quad), the callback we have provided is called.
You can see we are also providing a first argument (this). That argument is the owner of the event binding. In our code, this is the scene instance. We are stating that the GettingStarted scene instance is the owner of this event binding.
In practice, it means that if our scene is destroyed, the event binding will be automatically removed as well. You don’t need to remove it manually, ceramic will take care of that. If we destroy the quad instance, the event binding will also be removed as the quad was the object we were listening to.
Although in this example it doesn’t really matter, specifying ownership of event bindings becomes important on larger and more complex projects to ensure you won’t have anything leaking or being called accidentally on destroyed objects.
This whole concept of ownership and events will be treated in details in a separate article. For now, just remember that you should use this as first argument of your event binding and you’ll be fine!
Display an image with a quad
Quads are not only useful to display plain coloured rectangles and squares. They can be textured to display images.
We will do that by adding an image file into our assets/ folder and load it into our scene. I’ll use a PNG file of the Haxe logo (named haxe-logo.png) in my example.
Download the PNG file from the link above, then put it inside your project’s assets/ folder (you can also try with another image if you want).
Loading the image
In our GettingStarted scene, let’s add a new preload() method right before the create() method:
import ceramic.Color;
import ceramic.Quad;
import ceramic.Scene;

class GettingStarted extends Scene {

    override function preload() {

        // Load haxe logo image
        assets.add(Images.HAXE_LOGO);

    }

    override function create() {

...
The preload() method is called when the scene is preloading. During preload, you can use the scene’s asset manager (the assets object) to make it load the assets your want.
Ceramic generates constant types from asset files (here we got Images.HAXE_LOGO constant from haxe-logo.png file). If you type Images.| in your code, it will autocomplete with the image assets available:
That’s enough to let ceramic load our image!
Display the textured quad
Now let’s get back to our create() method. We will use a quad again, but this time to display the image we have loaded:
    override function create() {

        var logo = new Quad();
        logo.texture = assets.texture(Images.HAXE_LOGO);
        logo.pos(width * 0.5, height * 0.5);
        logo.anchor(0.5, 0.5);
        add(logo);

    }
This time, instead of setting an explicit size to our quad, we simply assign it a texture from our assets object. The quad will automatically set its size to fit the image texture we have assigned.
Then we put that quad at the center of the scene, with its centered anchor, just like what we did with the previous quad example:
Wonderful! You now know how to display images with ceramic 🤓.
Updating visuals over time
It’s pretty common in some games or graphical apps to have an update loop, where you execute code at every frame of the app. On a regular screen with a refresh rate of 60 FPS, that means your code is executed 60 times per second.
To execute code at every frame, you can bind a handler to the update event of the app. Let’s add some code inside our create() method:
    override function create() {

        var logo = new Quad();
        logo.texture = assets.texture(Images.HAXE_LOGO);
        logo.pos(width * 0.5, height * 0.5);
        logo.anchor(0.5, 0.5);
        add(logo);

        // Bind to app's 'update' event
        app.onUpdate(this, delta -> {
            // This code is executed at every frame
            logo.rotation += delta * 50;
        });

    }
This time, we are listening to app’s update event. This event is fired at every frame, calling our callback each time.
Our handler has a delta argument which represent the amount of elapsed time since last frame (in seconds). This allows us to know how much time has passed and apply some change accordingly.
In our example, we are simply rotating the haxe logo over time by updating the rotation property of the quad.
In the same way we attached a handler to pointerDown event before, we attached a handler to the app’s update event this time.
We can tidy that code a bit: as our GettingStarted class is a subclass of ceramic.Scene, it can directly implement an update() method, without having to bind to app’s update event explicitly:
import ceramic.Color;
import ceramic.Quad;
import ceramic.Scene;

class GettingStarted extends Scene {

    var logo:Quad;

    override function preload() {

        // Load haxe logo image
        assets.add(Images.HAXE_LOGO);

    }

    override function create() {

        logo = new Quad();
        logo.texture = assets.texture(Images.HAXE_LOGO);
        logo.pos(width * 0.5, height * 0.5);
        logo.anchor(0.5, 0.5);
        add(logo);

    }

    override function update(delta:Float) {

        // Executed at every frame
        logo.rotation += delta * 50;

    }

}
This code does the same thing as before, but using ceramic.Scene‘s predefined update() method instead of binding to app.update event explicitly.
One more sample…
Now that we have loaded that image and displayed it, we can also try some other variations of scene. The following code is another example of what you could do. We are adding some interactivity to the Haxe logo we loaded: every time you click on the logo, it moves to a different position, scale and rotation:
import ceramic.TouchInfo;
import ceramic.Quad;
import ceramic.Scene;

using ceramic.VisualTransition;

class GettingStarted extends Scene {

    var logo:Quad;

    override function preload() {

        // Load haxe logo image
        assets.add(Images.HAXE_LOGO);

    }

    override function create() {

        logo = new Quad();
        logo.texture = assets.texture(Images.HAXE_LOGO);
        logo.pos(width * 0.5, height * 0.5);
        logo.anchor(0.5, 0.5);
        logo.scale(0.5);
        add(logo);

        logo.onPointerDown(this, handleLogoClick);

    }

    function handleLogoClick(info:TouchInfo) {

        // Use transition API to move the logo
        // at a random position/scale/rotation
        logo.transition(QUAD_EASE_IN_OUT, 0.4, logo -> {

            logo.x = width * (0.1 + Math.random() * 0.8);
            logo.y = height * (0.1 + Math.random() * 0.8);
            logo.scaleX = 0.5 * (0.25 + 0.75 * Math.random());
            logo.scaleY = logo.scaleX;
            logo.rotation = 360 * Math.random();

        });

    }

}
In that last example I used one of the various utilities available in ceramic: ceramic.VisualTransition, which lets you interpolate visual properties with just a few lines of code. Here’s the result:
That’s all for now
These examples didn’t let you do much, but I hope it gave you a good starting point to create more things with ceramic!
At the moment, ceramic is brand new to the public and really lacks documentation. There are plenty of things you can do with it, but very few examples available. We only scratched the surface with this article!
To fix that, there is an ongoing effort to make ceramic more approachable and gradually provide more samples and examples, as well as better documentation in general, an API docs page etc… Bookmark ceramic’s Wiki Page as it’s where the content will be added.
Meanwhile, you are still very welcome to try ceramic. A #ceramic channel on Haxe Discord server has just been opened in which I will try to answer any question you would have, like “How to do X with ceramic?” or “What is this ceramic type for?” …
Haxe Discord is also a good place to get help with the Haxe programming language in general.
If you want to stay informed about ceramic’s next steps, you might also want to follow my updates about it on twitter.
Thanks for reading!